")
How to Use a Snatch Block Safely (Step-by-Step for Rigging & Pulling)
Jan 30th 2026
A practical, standards-minded guide for selecting and rigging a snatch block to redirect a line, increase pulling efficiency, and reduce strain on your equipment—without guesswork.
Quick answer
Inspect the block and rigging, confirm load/line ratings, choose the correct connection point, open the side plate, seat the rope/wire rope fully in the sheave groove, close and secure the pin/side plate, then tension the system slowly while watching for side-loading, misalignment, and snag points.
Jump to:
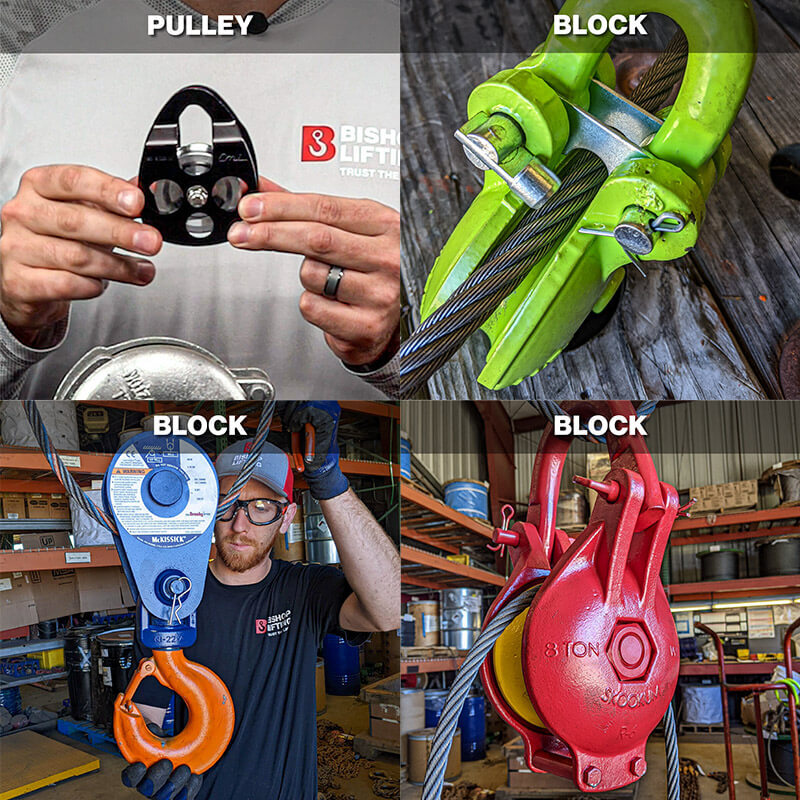
What is a snatch block?
A snatch block is a heavy-duty rigging block with a side-opening design that allows you to install it mid-line without fully removing or re-threading the rope/wire rope. In professional rigging and pulling applications, it’s used to:
- Redirect the line of pull for better alignment around obstacles
- Improve control by managing lead angles and reducing bad pulls
- Build mechanical advantage when rigged as a multi-part line (when appropriate)
If you want a deeper definition and terminology, read: What is a Snatch Block?
When should you use a snatch block?
Use a snatch block when a straight-line pull or lift creates poor angles, unsafe loading, or excess strain on equipment. Common applications include:
- Line redirection (pull around a corner / improve alignment)
- Recovery and positioning (controlled movement where anchor points are limited)
- Reduced equipment strain (better geometry, better lead)
Important safety note
A snatch block does not automatically make any operation “safe.” Ratings, angles, anchoring, and inspection determine safety. If you can’t confirm load/line ratings and connection integrity, stop and reassess.
How to choose the right snatch block
Selection should be based on ratings and compatibility—not just “fits the rope.” Use this checklist:
Selection checklist
- Working Load Limit (WLL): Choose a block with a WLL that meets/exceeds the maximum expected line load for your rigging configuration.
- Sheave size + groove compatibility: Match the sheave to rope/wire rope diameter to avoid crushing, pinch points, or accelerated wear.
- End fitting: Hook, shackle, or other fittings should match your connection and minimize side-loading risk.
- Bushing vs. bearing: Higher-cycle or smoother-control applications may benefit from bearing-supported sheaves.
- Application fit: Lifting, pulling, logging/yarding, or arborist rigging each have different demands—select accordingly.
Related “choose correctly” reads:
What is the first rule of rigging? (Inspection)
How to rig a snatch block (step-by-step)
Below is a professional workflow you can apply to both redirection and multi-part line setups. Your exact configuration depends on the job, the anchor, and the rated components in the system.
1) Verify ratings and plan the line path
- Confirm load weight (or estimated line forces) and verify WLL on the block and connection hardware.
- Choose an anchor point designed for the expected loading direction.
- Plan the lead angle so the line enters and exits the sheave cleanly (avoid side-loading).
2) Inspect the snatch block and the line
- Look for cracks, deformation, damaged side plates, worn sheave groove, or seized rotation.
- Inspect rope/wire rope for abrasion, kinks, broken wires, flattening, or heat damage.
3) Connect the block correctly
- Use the correct connection method (hook/shackle) and ensure the pin is secured.
- Avoid side-loading connectors; align hardware to the direction of pull.
4) Open, seat, and close the side plate
- Open the side plate fully and insert the rope/wire rope into the sheave groove.
- Ensure the line is fully seated and not pinched between side plate components.
- Close and secure the side plate/pin completely before tensioning.
5) Tension slowly and monitor alignment
- Take slack out gradually while watching the block, anchor, and connectors for shifting.
- Stop immediately if the line climbs the sheave flange, hardware twists, or anything binds.
- Once stable, proceed under controlled tension—avoid shock loading.
If your application involves synthetic winch rope installation and protection, this guide is helpful: How to Secure a Synthetic Winch Rope to a Winch (Correctly & Safely)
Safety checks before and during use
Pre-use checklist (quick)
- Inspect everything: block, pins, hooks/shackles, line condition, anchor integrity.
- Confirm correct fit: rope diameter and sheave groove compatibility.
- Control the lead: avoid side-loading and extreme fleet angles.
- Keep people out of the line of fire: no one should stand in the direct line path or near stored-energy zones.
- Avoid shock loads: smooth starts, smooth stops, no “yanking.”
Additional rigging fundamentals: What is Required for Rigging?
Common mistakes to avoid
- Side-loading the block or connector: misalignment can reduce effective capacity and damage components.
- Using the wrong size sheave for the line: causes accelerated wear and poor line handling.
- Ignoring the system: snatch block + line + anchor + connectors must all be rated appropriately.
- Not fully securing the side plate/pin: increases the chance of line escape or hardware failure.
- Shock loading: the fastest way to turn a manageable pull into a dangerous one.
FAQ
Does a snatch block always “double” pulling power?
Only when rigged into a multi-part line and when the rest of the system supports that configuration. In many jobs, the primary benefit is improved line direction and control—not automatic force multiplication.
Can I use a snatch block with synthetic rope?
It depends on the block design and groove compatibility. Some blocks are intended primarily for wire rope; always confirm the manufacturer’s recommendations and match the sheave to the rope’s diameter and construction.
What hardware is most commonly paired with snatch blocks?
Load-rated shackles are common for secure connections and alignment. Learn more here: What is a Rigging Shackle?
Shop snatch blocks and rigging essentials on Lifting.com
These links go to verified Lifting.com category pages and relevant educational posts. Each block includes a short intro to help buyers choose faster and convert with confidence.
Blocks & Pulleys
Start here to compare snatch blocks, shackle blocks, hook blocks, tailboard blocks, and more. Ideal if you’re selecting by application and connection type.
- Browse by block type and capacity
- Find the right style for lifting vs. pulling setups
Imported Snatch Blocks w/ Hook
A practical option for general pulling and redirection setups where a hook connection fits your rigging plan. Compare sizes and WLL to match your line and job requirements.
- Hook connection for quick attachment
- Multiple sizes for different wire rope diameters
Imported Snatch Blocks w/ Shackle
Choose a shackle connection when you want a more secure, aligned attachment point. Good for setups where you’re managing angles and minimizing twist.
- Shackle fitting for controlled connections
- Useful when alignment and stability matter
Crosby Blocks
For professional-duty rigging, Crosby blocks are a go-to choice. Compare models by capacity, bearing/bushing style, and connection type for your application.
- Trusted brand for industrial rigging
- Multiple block families and sizes
Shackles
Shackles are the backbone connection for many snatch block setups. Shop by type and choose based on load direction, pin style, and WLL—not convenience.
- Anchor/bow vs. chain (D) shackles
- Screw pin vs. bolt type for vibration-prone setups
Screw Pin Shackles
A common choice for day-to-day rigging because they’re fast to install and versatile. Use best practices to prevent unintended pin rotation and avoid side-loading.
- Quick installation for general rigging
- Choose the correct shape for your loading direction
Wire Rope Fittings
Build a safer, more reliable system with properly selected wire rope hardware. Useful for terminations, thimbles, clips, sockets, and other essential components.
- Improve connection quality and longevity
- Choose fittings appropriate for your rope and application
Winch Lines (Synthetic & Steel)
If your snatch block setup is part of recovery or pulling, make sure the line is suited to the job. Compare synthetic vs. steel options and match diameter and strength to your hardware.
- Options for off-road, utility, and industrial pulling
- Pair with appropriate hardware to reduce wear and risk
Keep reading (related guides)
Disclaimer: This article is for general education. Always follow equipment manufacturer instructions, applicable safety standards, and site-specific lift plans. If you’re unsure about ratings, angles, or configuration, consult a qualified rigger.
What Is the Difference Between a Gantry Crane and a Davit Crane?
Mar 13th 2026
Cranes + Winches Guide
Gantry Crane vs. Davit Crane: What’s the Difference?
Learn how gantry crane…

Do Lifting Chains Need to Be Certified?
Mar 10th 2026
Rigging Safety Guide
Understanding inspection requirements, chain grades, and how to choose liftin…

What Type of Chain Is Used for Overhead Lifting?
Mar 6th 2026
In overhead lifting, the “right chain” is not a preference—it’s a safety and compliance requirement…
Essential Equipment Used in Logging (The Gear That Actually Moves Wood)
Mar 4th 2026
Logging • Forestry • Rigging + Load Securement
Logging operations rely on heavy machinery—but the…

Ratchet vs. Lever Chain Binders: Which Is Better for Your Load?
Mar 2nd 2026
Load Securement • Binders + Chains • Field Guide
Choosing the right chain binder isn’t just prefer…
Lifting vs. Rigging Equipment: What’s the Difference (and What You Actually Need)?
Feb 24th 2026
Lifting & Rigging Fundamentals
“Lifting” and “rigging” get used interchangeably on job sites—but…

The Complete Buyer’s Guide to Overhead Cranes
Feb 13th 2026
A practical, standards-minded guide for selecting an overhead crane system—and the hoist + rigging…
Which Pulley Can Lift Heavy Loads?
Feb 11th 2026
A Buyer’s Guide to Blocks & Snatch Blocks
If you’re lifting or pulling serious weight, you’re usua…
When Should a Spreader Bar Be Used for Lifting?
Feb 3rd 2026
Rigging + Below-the-Hook Devices
A spreader bar (often called a spreader beam in product catalogs)…